Hyperoptic faults behave differently from the rest of the UK broadband market, and that is why generic advice so often fails on them. There is no phone line, no microfilter and no master socket to test, because Hyperoptic runs full fibre into the building rather than copper from a street cabinet. The router is not one device either: the Hyperhub name covers eight different units from four different manufacturers, so light colours, menu layouts and button positions vary from flat to flat. On top of that, Hyperoptic wires whole buildings, which means a fault two floors below can take your connection down with it. This guide works through the checks in the order that rules out the free fixes first, using Hyperoptic's own published guidance at every step, and it is honest about the points where nothing you do at home will help.
Hyperoptic WiFi that has stopped working clears in a set order. Check Hyperoptic's service status in My Account first, because an outage is the one cause no home fix touches. Then restart the Hyperhub at the mains and wait a few minutes, plug a laptop into the router by Ethernet to separate the line from the WiFi, and only then adjust bands and placement.
Key Takeaways
- Hyperoptic's own service status check in My Account comes first, because a building or area outage cannot be fixed from inside the flat and rules out wasted troubleshooting.
- The Hyperhub ships as eight different routers from four makers, so lights and menus differ by model and the label on the back decides which of Hyperoptic's guides applies to you.
- Plugging a laptop into the Hyperhub by Ethernet is the single most useful test, because a working wired connection proves the line is fine and moves the fault onto the WiFi.
- Hyperoptic is full fibre to the building, so there is no phone line, no microfilter and no master socket test, and DSL advice written for BT or Sky connections does not apply.
- Hyperoptic Total Wi-Fi with a Minihub is the better coverage fix for most flats, with a single plug-in extender reserved for one stubborn dead room.
The Hyperoptic Fix Order At A Glance
Almost every Hyperoptic fault falls into one of five buckets: a service outage at building or area level, a Hyperhub that needs restarting, a loose cable between the router and the wall, a single misbehaving device, or a WiFi coverage problem that was always there and has just got worse. Working them in order matters, because the quickest and most common fixes sit at the top and the disruptive ones sit at the bottom.
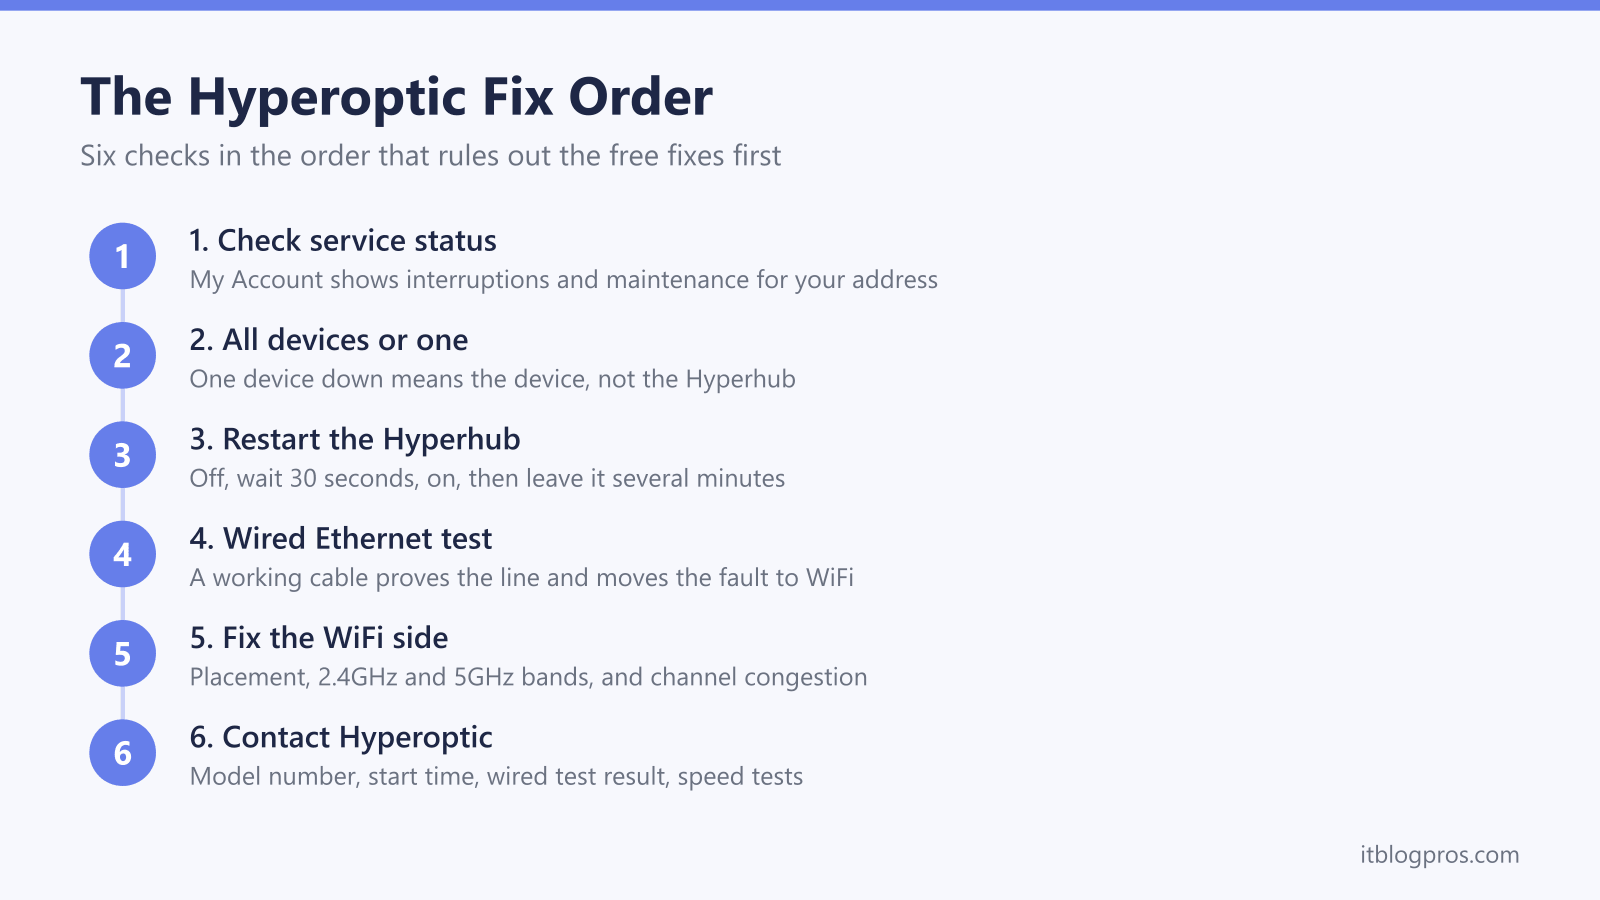
Work down this ladder and stop at the step that brings the connection back:
- Sign in to Hyperoptic's My Account and check the service status for your address.
- Establish whether every device is affected or only one.
- Restart the Hyperhub properly and leave it alone while it comes back.
- Plug a laptop into the Hyperhub by Ethernet to separate the line from the WiFi.
- Fix the WiFi side with placement, band choice and channel changes.
- Report it to Hyperoptic once the home checks are exhausted.
The sections below take each step in turn. Skipping straight to a factory reset is the most common mistake, because it wipes any settings you have changed and rarely fixes a fault that a plain restart would not have cleared.
Step One: Check Hyperoptic's Service Status Before Touching Anything
An outage is the one cause that no amount of rebooting will touch, so it goes first. Hyperoptic runs its own service status check tied to your address rather than a generic postcode map. Sign in to My Account and it reports planned maintenance, current service interruptions and estimated resolution updates for the address on your account.
Hyperoptic's guidance is blunt about what to do with that information: if a known issue is already listed, there is no need to contact support unless you have something further to raise. The service comes back on its own once the work is finished, and reporting it again adds nothing.
Hyperoptic also publishes a step-by-step troubleshooter with two paths, one for loss of service where one or more devices cannot connect, and one for speed problems. It is worth running alongside these checks, because it is the same script the support team works from and it records what you have already tried.
One practical cross-check that suits Hyperoptic better than most providers: ask a neighbour in the same block. Hyperoptic wires whole buildings, so a fault affecting the block will hit several flats at once, and that is useful evidence before you spend an hour on your own kit.
Why Standard Broadband Advice Does Not Apply To Hyperoptic
A large share of the broadband troubleshooting advice online was written for BT, Sky, TalkTalk and other providers running over Openreach copper. None of it transfers cleanly to Hyperoptic, and following it wastes time or makes things worse.
Hyperoptic is full fibre delivered into the building rather than a copper pair from a street cabinet, so there is no telephone line involved in the broadband service. That means there is no microfilter to swap, no master socket to open up, no test socket behind the faceplate, and no DSL sync speed to check. Advice telling you to unplug every phone extension or plug the router directly into the master socket simply has nothing to act on in a Hyperoptic flat.
What you have instead is a short cable running from the WAN port on the back of the Hyperhub to the wall. Hyperoptic describes the other end as the socket or the fibre converter, because the arrangement varies by building: some flats have a network socket on the wall fed from equipment elsewhere in the block, others have a small powered unit in the flat itself. Either way, that one cable is the whole physical path worth checking. Hyperoptic's own no-connection guidance asks you to confirm it is firmly seated in the WAN port at the router end and in the socket or converter at the wall end, then to swap the cable ends round to rule out a failing lead.
If you are getting a connected WiFi signal with no internet behind it, the general causes are covered in the guide to WiFi that says connected with no internet, which applies to any provider.
Step Two: Establish Whether It Is Every Device Or Just One
This split saves more time than any other single check, and it takes thirty seconds. Pick up a phone, a laptop and one other device, and see how many of them have actually lost the connection.
If everything in the flat is down at once, the fault is upstream of your devices. That points at the Hyperhub, the cable to the wall, or Hyperoptic's service, and the rest of this guide applies in order.
If only one device is affected while everything else works normally, the Hyperhub and the line are both fine and the problem is on that device. Forget the saved network on the device and rejoin it with the password from the card, toggle flight mode or the WiFi adapter off and on, restart the device, and check whether a VPN, a work profile or a DNS setting is intercepting the connection. Devices that hold on to a stale network profile after a router change are a common cause of this pattern.
If devices are connecting and then dropping off again every few minutes rather than failing outright, that is a different fault with its own set of causes, covered in the guide to WiFi that keeps dropping.
Step Three: Restart The Hyperhub The Right Way
A restart clears the majority of temporary faults, and it is the highest-yield step once an outage is ruled out. It is also frequently done badly, with people toggling the power repeatedly and never letting the router finish coming back.
Hyperoptic's own method is straightforward. Press the power button on the Hyperhub to turn it off, or pull the power lead from the back if your unit has no button. Wait around thirty seconds so the connection fully drops, and Hyperoptic's speed test guidance suggests thirty to sixty seconds for the same reason. Power it back on and then leave it completely alone for several minutes while it re-establishes the link and brings the wireless back up.
The important part is the waiting. A Hyperhub takes a few minutes to come back fully, and interrupting it halfway through only restarts the clock. Reconnect a device once the wireless network reappears in the list, not before.
A factory reset is a different action entirely and belongs much further down the order. On a Hyperhub it means holding the recessed reset button for around ten seconds, which wipes the configuration and returns the router to the details printed on its label. That undoes any WiFi name or password you have set and forces every device in the flat to be reconnected, so it is worth doing only after the wired test below has pointed the finger squarely at the router.
Step Four: The Wired Ethernet Test That Separates The Line From The WiFi
This is the test that decides everything that follows, and it is the one step most people skip. Take a laptop or a desktop, run an Ethernet cable from it to one of the LAN ports on the back of the Hyperhub, and see whether the internet works on that wired connection.
A wired connection that works proves the line into the flat is healthy, the Hyperhub is routing traffic, and Hyperoptic's service to your address is up. Everything left is a WiFi problem, and the next section is where to go.
A wired connection that also fails means the fault sits in the line, the cable to the wall socket, or the Hyperhub itself, and no amount of WiFi tinkering will help. Reseat the WAN cable at both ends, swap the cable ends round as Hyperoptic suggests, try a different LAN port on the router, and if it stays dead move to the contact step.
The same wired test is how you settle an argument about speed rather than connectivity. Hyperoptic's speed test guidance is explicit that you should run the test on Ethernet where possible, because WiFi is often the limiting factor, especially through walls or at distance. Pause streaming, downloads, cloud sync and game updates on other devices, switch off any VPN or proxy temporarily, and run two or three tests about a minute apart to find the typical result rather than trusting a single noisy reading. A wired result close to your plan with poor wireless performance is a WiFi problem, not a broadband fault.
The Hyperhub Is Eight Different Routers, So Check The Label First
This is the single biggest reason generic Hyperoptic advice goes wrong. Hyperhub is a brand name, not a model, and Hyperoptic's own router setup pages list eight separate units from four manufacturers under it: the Zyxel EX3501, EX3301 and EX5601, the ZTE H3600, H298A and H298N, the Nokia HA-140W-B, and the Tilgin HG2381.
Those units are not variations on a theme. They come from different vendors with different firmware, so the number of status lights on the front, the colours they use, the meaning of a flashing light, the position of the WLAN and reset buttons and the entire admin menu structure all vary between them. Any article that prints one Hyperoptic lights table and implies it covers every customer is guessing, and following the wrong table leads you to diagnose a fault that is not there.
The fix is to identify your unit before you interpret anything. Turn the router around and read the model number from the sticker on the back or underside, then look up that specific model's guide in Hyperoptic's help centre. The sticker carries the model number, the default wireless network name and password, and the admin credentials, and most installations also come with a small removable card holding the same wireless details.
What does hold across the range is how you get into the settings. The Hyperhub admin page sits at 192.168.1.1 in a browser on a device already connected to the router, and the credentials come from that card or the sticker rather than being a shared default across all customers. The full walkthrough, including what to do when the password on the label is refused, is in the Hyperoptic router login guide.
Step Five: Fix The WiFi Side With Placement, Bands And Channels
Once the wired test has shown the line is healthy, the remaining work is wireless, and three things account for most of it.
Placement comes first and costs nothing. A Hyperhub shoved into a media cupboard, tucked behind a television or sitting on the floor behind furniture is losing a large share of its range to obstruction. Stand it upright, high and as central to the flat as the wall socket allows, clear of metal, mirrors, water tanks, microwaves and other electronics. In flats where the Hyperoptic socket sits in the hallway cupboard, moving the router even a metre into open air often changes the picture in the far bedroom.
Band choice is next. A Hyperhub broadcasts on 2.4GHz and 5GHz, and they behave very differently. The 5GHz band is much faster but falls off sharply through walls, while 2.4GHz travels further but is slower and far more crowded, particularly in a block of flats where dozens of neighbouring networks share the same air. If your devices are all clinging to one band, splitting the two networks into separate names in the admin pages lets you put a television or console near the router on 5GHz and leave distant smart devices on 2.4GHz.
Congestion is the third. Purpose-built blocks are dense with competing WiFi, and a 2.4GHz channel that was quiet when you moved in may now be shared with several neighbours. Changing the 2.4GHz channel in the Hyperhub's wireless settings to one of the non-overlapping options is a low-risk change that sometimes restores a struggling connection in a back room. Where the exact menu path sits differs by Hyperhub model, which is another reason to identify your unit before going hunting.
When The Fault Sits In The Building Rather Than Your Flat
Hyperoptic's delivery model makes building-level faults far more likely than they are on a provider that runs a separate line to every address. Fibre is brought into the block and distributed to individual flats from equipment inside the building, so a power problem, a hardware failure or maintenance work in the riser cupboard can take out multiple homes at once.
The signs are recognisable. Nothing you do at your end changes anything, the wired Ethernet test fails as completely as the WiFi, a restart makes no difference, and, most tellingly, neighbours in the same block report the same thing at the same time. If the service status check in My Account is already showing an interruption for your address, that confirms it.
There is nothing to fix from inside the flat in that situation, and swapping cables or resetting the Hyperhub will not shorten the wait. Note the time it started, check My Account for the estimated resolution update, and let the work complete. The one useful thing you can do is make sure the contact details on your account are current, because Hyperoptic uses them to push service notifications about exactly this kind of interruption.
Access is the other building-level complication. Where a fault needs an engineer to reach communal equipment, the timescale depends on building access arrangements as much as on Hyperoptic, which is why block-wide faults sometimes take longer to clear than a single-flat fault would.
When A Genuine Dead Zone Is The Real Diagnosis
Some Hyperoptic complaints are not faults at all. If the connection is solid everywhere except one room, has always been that way, and the wired test shows the line running at full speed, the honest diagnosis is coverage rather than a broken service. No restart or reset will change the physics of a thick wall.
For most flats, Hyperoptic Total Wi-Fi is the better answer here, and it is worth saying so plainly before recommending anything from a shop. Total Wi-Fi is Hyperoptic's own mesh service, adding a Minihub unit that works with the Hyperhub as a single mesh network across the property, at a stated £7 a month unless you are on a special offer. One Minihub covers most homes and Hyperoptic will supply a second on request for larger properties. Because it is supplied and supported by Hyperoptic, it stays inside your existing support arrangement, which a third-party box does not.
A standalone extender only really wins in one scenario: a single stubborn room, no appetite for another monthly cost, and a willingness to accept a second network name rather than seamless roaming. In that narrow case a plug-in unit like the TP-Link RE315 placed roughly halfway between the Hyperhub and the dead room does the job cheaply.
Be clear about the caveat before buying. The RE315 supports TP-Link OneMesh, but OneMesh only forms a mesh when it is paired with a TP-Link OneMesh router. Behind a Hyperhub it runs as an ordinary range extender, which means a rebroadcast signal, roughly half the wireless throughput on the extended network, and devices that may hold on to the weaker link rather than switching back cleanly. That is an acceptable trade for a spare room or a garden office, and a poor one as a whole-home coverage strategy.

The wider comparison between adding one extender and moving to a proper mesh system is set out in the guide to extenders versus mesh for dead zones.
Step Six: When Contacting Hyperoptic Is The Right Move
Escalate once the home checks are genuinely exhausted rather than at the first sign of trouble, and the conversation goes much faster because you can hand over evidence instead of symptoms.
Contact Hyperoptic when the wired Ethernet test fails as well as the WiFi, when a proper restart and a reseated WAN cable have changed nothing, when the service status check shows your address as healthy but the connection is plainly not, when wired speed tests come back far below your plan across several attempts, or when the Hyperhub shows an obvious hardware problem such as failing to power up at all.
Before you get in touch, gather four things: the Hyperhub model number from the sticker on the back, the time the problem started, the result of the wired Ethernet test, and two or three wired speed test results. Those four details let the support team skip the opening script and move to the checks that matter.
Hyperoptic's help centre carries the troubleshooters, the service status check and live chat, and My Account is where a fault against your address is raised and tracked. If the diagnosis lands on the router itself, replacement is a matter for Hyperoptic under your agreement rather than something to solve by buying hardware.